Friday 27 September 2013

Final Reflections

Overall the course, and the final project particularly proved more challenging than I expected.  I didn't realise at the beginning exactly how hard it would be to motivate myself to get going, nor how hard it would be to set time aside for myself.  before starting the course  I believed that I was home all day with my kids doing nothing and I had heaps of time to myself, I see now that that was incredibly naive, all the little things I do, the hoovering and the washing and the reading and the playing and the teaching and the endless, endless cooking actually add up to quite a big thing and I am quite short on time because of it.
Aside from the actual logistics of just getting things done I have found the whole course thoroughly enjoyable, maybe apart from the design section, the practical work has been a wonderful experience and an excellent way of getting back into using creative processes every day.  I have found it hard keeping the learning log and being honest a good deal of this was typed well after the fact.  During the first two assignments I kept a logbook written by hand and filled with stuck in images an paraphernalia and I was much  happier with this way of recording my learning processes, but after my tutor told me I should think about the presentation of it my head interpreted that to mean that my way was wrong and I should keep a digital log like everyone else.  This would be the one thing that I would go back and change, I would have stuck to my guns and worked in a way that suited me better.
I think I have got a lot out of this course and I really can't wait to begin the next one, which hopefully I can complete at much greater speed!

Project 10 - Stage 4 - Making Your Textile Piece


This the final piece.  I'm pleased with it all overall, I managed to include many of the techniques that I had wanted to.  My tutor felt that the large mushrooms were too big and dwarfed the smaller elements somewhat, but that is sort of what I was trying to achieve, I didn't want lots of dainty little things on a minute scale, it would have been too fiddly and finicky for me to execute well.

The large mushrooms were constructed using calico on the outside, the tops were painted, the brown ones spattered with sepia ink, the purple one was decorated using my favourite watercolour ink and bleach and salt technique, unfortunately with age the bleach has yellowed slightly, but I am unsure what else I could have used to avoid this, I constructed tube stems from the same fabric and then for the underneath I made some yo-yo puffs, to echo the gill shapes of field mushrooms, from lighter fabrics and then stitched the whole lot together.


For the grey and purple lichen, I used the kunin felt that I'd been experimenting with in my sketchbook, using heat zapping techniques, this ate wonderful lichen like holes in the felt, although slightly singed it in some places, I then stitched on small patches of purple sheer to echo the colours that I had been so inspired by, and  stitched them down with white thread.


I love these little parasol mushrooms, they are made with a top of painted felt, stuffed with pink roving that was felted into a cup shape and stitched together very tightly to achieve the fluted edges of the real mushrooms, the stalk was made from beading wire wrapped with embroidery thread and glued in place.


The cage fungus was made from a twisted beading wire frame wrapped in cream mohair to give it some texture.

The whole thing is mounted on a bed of pink slime mould that I built from a base of quilted hand painted calico, quilted in organic circular shapes to echo the pillowy mass of slime mould.  I also constructed some tube lichen made from a puff paint, layered net and painted base, some small slime moulds from silk flower stamens glued into clear glass beads.  The whole thing was enhanced with some needle felted lumps, French knots, cross stitches and a little beading.

Reflections

I can see a continuous thread of development running all the way through my themebook, my sketchbook and then into my final piece.  For my final design I painted a very loose watercolour, gathering together all the design ideas I'd been working on up to that point and I think I remained quite true to that painting in the finished piece.

I find it hard to say that I managed to make all the right decisions, i question myself so much that I'm never totally sure about anything.  I can only say that I am content with my choices and overall pleased with the final piece, although I think maybe it should have been more circular.

i interpreted my ideas using my chosen techniques and the materials at hand to the best of my abilities I think, although I began this assignment convinced that I wanted to make a weaving, I'm glad that I ended up making the choices that I did.

I believe that my final design is both inventive and coherent.  I managed to carry through the ideas that I had during my theme book and I think that I did it in quite a creative way.

Project 10 - Stage 3 - Developing Your Design


The bottom image is a painting I did right before I began doing any practical work on my final piece, it was, then, just an idea of what I wanted to create, but it became  almost like a pattern that I started to follow and in the end what I made was very like this painting.

I chose not to do the geometric shape/framing design exercise that is mentioned in the course notes, I found this way of working during project 4 quite non-intuitive for me and I really didn't wish to revisit it.  Also by this stage I had a pretty firm idea of what I was going to create, i wasn't looking to design any further, i was just figuring out methods of execution that were going to work well in the context of the sculpture.

Project 10 - Stage 2 continued

Sketchbook work based on my Theme


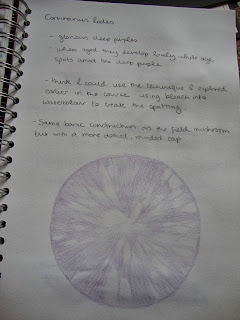
Working directly from my themebook I tried out a lot of different drawings and colouring techniques to find methods I felt went really well with the different fungi and lichens that i wanted to use in my final project.  I already had it in my mind that I wanted to make a sort of a fabric sculpture of the different sorts of cryptogams that I'd come across during my research.

Project 10 - Stage 1 and 2 - A Design Project

I have to be honest and say that I really struggled with this project, it's been quite a journey and what I've ended up with is nothing like what I began.  I started 4 different projects and became disenchanted with the first three very quickly.  I lost my original theme book in a small kitchen flood and it was overall quite a traumatic project for me.

Stage 1

Reviewing all the work that I have done so far reminded me of all the things I have loved doing since I began this course.  The things that were foremost in my mind after sorting through all the work were:-

the watercolour, bleach and salt effect from Project 1
the French knot exercises from Project 2
the yo-yo puff fabric manipulation from Project 6
the needle felted nodules from Project 9

Stage 2

Theme book inspiration can be found here.

The more I researched the family of cryptogams the more I fell in love with really strange ones, the slime moulds and the alien looking fungi, and especially those that were in outlandish colours, wonderful pinks and purples, even blues.


I was thinking of some of the things that I'd found inspiring over the duration of the course, the beautiful biotopes of Amy Gross, the incredible imagined worlds of Pip & Pop and the breathtaking fabric sculptures of Mr Finch.  This led me to the thought of creating a small secret world or cryptogams.

Sketchbook 5


Project 9 - Reflective Commentary

I think I did manage to gather a big enough selection of yarns and materials to experiment with during this project.  Unlike the last one I never felt that I was restricted by not having the exact right colour I was looking for.  I was most drawn to natural fibres, as always, which I think add a lovely feel to any piece, they also add a solidity texture wise that I enjoy.

I expected to be frustrated by the relative slowness of weaving techniques but actually I revelled in it, until I started messing about with strung  beads.  I suspect that this has something to do with the loom I was using having a heddle, and that was just down to good fortune!

Apart from the problems I've already mentioned I am genuinely really pleased with my final sample.  I struggled with the pattern as I've already mentioned, I find it far easier to work from the internal pattern in my brain than I do sticking to a paper pattern.  This was as far as I am concerned the only part of the design process that just doesn't work for me.

I do enjoy putting things together more intuitively rather than working from a source, mainly, i think because when I use a source I fall back into the trap of trying to match things exactly, finding the perfect shade.  I find it a lot easier and preferable to choose yarns that I think will work together and then deciding what to do with them.


Project 9 - Stage 4 - Developing Design Ideas

I decided that I would begin with doing sample 1 for this stage, and use an image which inspired me to translate it into a woven piece, I intended to also do sample 2 later on, but as often happens life got in the way and time spent in France meant that I was just unable to achieve as much as I wanted to.

I wanted to work with a whole new image this time around and at the time one of my bedside books was Microcosmos by Brandon Boll which is a collection of super macro photography that I found very inspiring.  The image that I finally settles on is a 9960x magnified photo of ulcer bacteria on a human stomach lining.  I think this one in particular grabbed me because I loved the colour combinations (artificial, i think) at once and the more I looked at it the more I could see in transformed into a woven piece.

I drew the plan for it out on graph paper and almost at once lost any interest in taking it any further! The paper plan was to me, deeply uninspiring, it really turned me off, and I came very close to giving up the whole idea but I loved the image so much that I convinced myself to carry it through.  I have to admit though that after drawing the plan I put it away and never looked at it again.


Some things I'd like to change about this piece are :- the choice of yarns, almost all work on this piece was done at night and in the light of day I realised that the wonderful deep jade green was actually more of a foresty green and seriously inaccurate with regards to colour matching, I would've liked to have managed to get my felted ghiordes knots into a lozenge shape but no matter what i did they seemed to stay circular, I wish I'd have waited to get a darker green thread to string the beads with, i dislike the paler thread showing through and in fact I might have abandoned the idea of weaving the strung beads completely as it wa very fiddly and time consuming, perhaps stitching them on afterwards would have been a better approach, also I think I should've used a darker warp thread to hide the odd spot where it shows through,  finally I wish I'd been able to keep the edges straighter, I think this was a consequence of using such a small loom and having to string it with a long warp which was then wound on, it was hard to achieve, even with help from my partner, so the tension was a bit uneven throughout.

Having said all of that, I really am pleased with the finished piece.  I think the felting works well in conjunction with the weaving, in brings the texture of the nodules to the piece, I'm not sure of another way I could have achieved this.  I've never seen another piece quite like it, whether that's a good thing or not, I'm not entirely sure!

Project 9 - Stage 3 - Experimenting With Different Materials

Seeing as the loom I am using is fairly small and fairly quick and easy to warp up I decided that rather than following the course notes and completing all of these experiments on one piece of weaving I would make several different samples.  I have to admit that I may have become carried away a bit, I absolutely fell in love with weaving, it's so relaxing and it's been the most enjoyable part of the course so far for me.  I even have my own proper table loom now, an old Weavemaster that a friend of my Mums' was giving away, I haven't quite mastered it yet but I definitely will in the near future.

I wanted to try out using a different fibre for the warp so I strung it with a pure wool yarn which gave it a much softer, more flexible feel to the finished product than the cotton warp that I'd used up until then.  I also wanted to experiment with making a narrower piece so I only strung a middle section of the loom, the photo of this piece seems to have been another casualty of my laptops' death but there is a photograph of it mounted for assessment in another post.

I made a second narrow sample but this time using jute twine as the warp, this gave a much more solid weaving which I really like.  I stuck with plain weaving this time because I wanted to focus on the way the yarns wove, first was a variegated wool/acrylic blend which gives a wonderful mottled effect, then a chunky wool yarn which leaves the jute warp somewhat exposed because of it's thickness, I enjoy this effect though.  In the middle section my intention was to leave a section of warps exposed and create a shape of ghiordes knots in the middle of that space.  I wrapped the two outer warps of each edge in white mohair to create a frame for the space and then tied some ghiordes knots in a circular shape in the centre of the empty warps.  I then completed the other half of the piece to reflect the first half.  By the time I had finished I didn't like the effect of the ghiordes knots, so, because the had been done in a wool yarn I decided to take a barbed needle to them and needle felt them.  I don't know if this is a proper weaving technique, but I really liked the result, my children have christened it 'welting' :)


I realised that I hadn't tried out any different fabrics or any more advanced weaving techniques so I embarked on another sample to try out some of these.  I strung the warp in a very dull blue acrylic to see what sort of  effect a different coloured warp would add to the finished piece.  from bottom to top this one goes:-  crochet cotton with ghiordes knots, chain stitch in a chunky wool/acrylic yarn, plain, 2/2 direct, 2/2 broken and 3/1 direct all in hemp twine, recycled t-shirt strips in ghiordes knots, continuous Spanish knots and soumak in variegated acrylic, senna knots in chunky, plain weave and ghiordes knots in crochet cotton again.  I am particularly interested in the effect of different weaving stitches that I used the hemp to show, it has a wonderful brickwork like effect and the feel of that section makes me think of table mats or basket work.


For the final part of Stage 3 I was asked to select ares from my experimental weavings to explore further.  The parts that had really appealed to me were the boucle section from the first weaving, it gives a lovely tight textural effect, I loved using the ghiordes knots but wanted to try them out in a stiffer yarn to make them stand up more, also from the first piece I really liked the bead insertions, and the jute, I love the thick jute warp combined with a chunky yarn from my second sample, I also liked the white spots from the first sample but felt that they needed more uniformity.  I wanted to incorporate all of these ideas and the combination of the natural fibres with a stronger accent colour from my first two experiments.  What I didn't like was the softness that using wool for a warp gives the finished piece, so i decided that I'd go for something with more body and strength and settled on a sisal twine which I thought would also serve to lighten up the colour scheme a little.  I began with some plain rows of boucle, I felt that any other pattern would become lost in the heavy texture of the yarn, then an insertion of the really chunky jute, I'd been meaning to try out using two yarns in the same pick so I worked it in here using a chunky wool combined with raffia and then some DK pure wool combined with paper twine.  Next were some rows of ghiordes knots in paper twine which gave them the stiffness I was after, I really like this quality, it gives the piece a feeling of wheat fields.  The spots from the first piece became reagular stripes in this version and I actually like them far more than the spots, and as I was already thinking of wheat fields these stripes became ploughed furrows.  I tried out some wool roving as a yarn next as a substitute for the chunky yarns and it acted exactly as I wanted it too, leaving the warp exposed because of it's thickness.  i remembered I hadn't added any beads at this point so they were shoved in at the last moment to act as stones in my woven field and then I finished the whole piece with a few more rows of the boucle.

I'm really pleased with this piece, particularly that despite using lots of different materials I managed to keep the edges straight and the tension was good.  I think using such a firm weft helped immensely with this.  The drawback to using the sisal, which I discovered only after cutting the piece of the loom, is that I can't tie a firm knot in it so I'm left worrying that the whole lot might fall apart any second, however the cut sisal ends just add to the effect of that wheat field in my head!

Project 9 - Stage 2 - Woven Structures

I feel, perhaps, like I might've cheated a bit here.  I was all set to start building my own tapestry loom when all of a sudden I found a vintage toy loom in a charity shop for £5.  I felt it was meant to be there, just waiting for me and I just couldn't pass it up, also it ended up saving me quite a bit of money I think, it also came with a knitting dolly and a beading loom, which looks very complex but should at least keep my kids quiet for a bit while I work.  Another plus is that this toy loom has a heddle which seems unusual in toy looms from what I've seen, and that is a massive time saver.
My Mum had been in Edinburgh over the Summer and sent me some beautiful postcards from the Dovecot Studio which I have been drooling over and using as inspiration in lieu of making it up there myself.  Also in the way of research I got a lovely little book called 'Weaving - Methods, Patterns and Traditions of an Ancient Art' which although very tiny contains a wealth of information.  In my local library I found a couple of weaving books which set me up well to start experimenting.
There was a bit of a gap between finding my loom and getting hold of some weaving books and me being me I decided to just bash on and have a go, it didn't turn out too badly but I had no real idea about what to do with the ends or how to add in new colours, because of this my first piece is a bit rough around the edges, but I am really pleased with how it turned out.  The first weaving I did was based on one of the wool wrapping, colour analysis exercises from the previous project.  It was based on a photo of the Highlands at sunset and I think the weaving is a pretty good representative of that.


For my next attempt I decided to start over and follow the instructions properly and work in black and white to try out all the different techniques form the course literature., focusing on the effects rather than the colours.  From top to bottom of the weaving I tried - plain weave, focussing on keeping the tension at the sides correct, curved wefts, soumak, ghiordes knots and then plain blocks with splits.


Project 8 - Reflective Commentary

I enjoyed, very much creating these constructed surfaces once I had gotten past the initial braiding stages.  I loved starting of with a line and ending up with a surface, it's like magic and I can't wait to get into the weaving stage and take this idea further.

For me, the samples that worked best were the ones that created some movement, and were interesting to the eye.  The grids made from copper and jute are the most interesting to me because of this.  I also think working in a simpler more straightforward material emphasises the shapes of the grid work, when  bigger, brighter yarns were incorporated the pleasing simplicity of a grid was somewhat lost.

In the colour  matching exercise I think I managed to be pretty accurate with paint and drawing media and as accurate as it was possible for me to be when it came to matching the yarns.  Since the last project I feel I've managed to rationalize that it's not always possible to match a yarn or a fabric exactly and that making sure the ones you have are working together is just as important as matching them to the original image.

Project 8 - Stage 2 - Exercise 4 - Grids

Exercise 4

I began this exercise by experimenting with some pipe cleaners and craft straws from my kids make and do box but I found the colours really unappealing and verging on the offensive, so I decided to use some other materials to start making my 'proper' samples from.  They did help me figure out some good construction methods though.

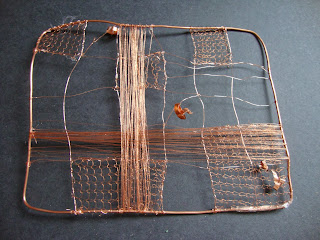
I began my grid making proper making a large rectangular open grid inspired by a box of coppery supplies that I found in a cupboard.  It was difficult to get the thin copper wire of the grid to sit at the correct tension within the thick copper wire frame so I decided that my grid wouldn't be having a huge number of boxes within it.  I believe the same type of grid would work better with the outside frame made of a less smooth material, but then it would have lost some of it's appeal so I decided to persevere.  I also had some copper machine thread that I wrapped around the frame in two perpendicular panels, this gave a really nice effect at the point where the two sets of wrapping crossed over each other.  Also within my supplies I found a roll of something that looks like knitted copper wire sheets, I have no idea what it's intended use is, or even where I might have bought it but it is very beautiful and texturally interesting so I was determined to include it somehow.  The method that I settled on was using a fine copper wire to 'stitch' through the knitted links and then around the squares of the grid, literally sewing the two together.  It was a very laborious and time consuming process but I'm glad I stuck with it, the knitted copper really adds something to the piece that I think it needed.  As a side note, I later saw Cornelia Parker in  BBC4 documentary working on one of her drawn wire bullet pictures and was struck by the similarity of her technique, I also noticed that she had the good sense to wear very thick gloves and use pliers!  I completed this grid by suspending some interesting looking copper shavings within some of the empty grid squares.  I felt this added a degree of movement and interest that it had needed and rounded the piece off well.  I'm very pleased with this piece, and I very much enjoyed using textile techniques on a non textile piece.


I also found, sitting about doing nothing, some very long and thin pieces of wood that I guess may have been intended to be used in model making, with one I made a frame, bound together with yarn, and then created a simple but very full grid using paper string.

With the other length of dowel I created the grid itself from the wood, glued it together, and as it was self supporting I decided to do without the frame.  I filled some of the grid squares with some pasted on sheer ribbon which gave an almost stained glass like effect and then to add some movement I wrapped the grid diagonally with some eyelash yarn, not only does this add a bit more interest than using a plain yarn but I feel very pleased that I've finally found a reason for using eyelash yarn!

Something else that I found lurking was a roll of very small chicken wire.  I suspect that it probably should be used at a florists but I was more interested in it providing me with a ready made grid.  I wove my favourite dusky pink chunky yarn through the grid holes but only one thickness of yarn left it too gappy for my liking so I wove another set of chunky yarn through, this time in contrasting white.  This filled the grid better and I was pleased with the result.  It gave me a nice surface that is very pliable and I believe that it could probably be stitched into to add further layers of interest.  It's a technique I would like to return to in the future.

For my final grid I wanted to use the lovely thick jute that I liked so much in the previous exercises.  The really thick four ply jute seemed perfect for creating a grid with so I made a very simple square shape by knotting four lengths together at the corners, I then constructed the grid form the finer jute by tying lengths of that along the frame edges.  I did quite like it as it was then but it had a feel of the cargo net to it so I began to work further into it weaving through the grid work in a spiral.  If I had had more time I would've liked to try out making a circular grid in the same fashion.

Project 8 - Stage 2 - Exercise 3 - Binding

Exercise 3

I began this exercise by making a square frame of kebab sticks and binding them together with wire.  Keeping the brief in mind I wrapped it with different threads, from the very fine machine cotton to a yarn made from strips of my sons old t-shirt, also whilst thinking of the light and space between the threads I decided that some sheer ribbons would add interest.  I was pleased with the results, it's quite pretty, easy on the eye, non-offensive, but it's not terribly exciting or inventive or creative, so I decided to up my game a bit.


I moved on to making some more of these samples and trying to make them a little more interesting.

First I made a thick braid of the recycled t-shirt fabric which I them wrapped with beading wire, mainly to join the ends together, but also to stiffen the whole thing and give it a bit more body.  Next I began wrapping the whole the with rounds and rounds of self patterning fair isle yarn.  Unfortunately the whole thing wasn't as stable as I thought it was going to be and as the wrapping went on the nice triangle I'd started with had become a sort of squashed fang,

My second sample was made in the same way but using a mice thick braid, made from 4 ply jute, around the outside, because it's such a thick yarn to begin with I decided to forego any sort of stiffening and so to join it I wrapped the ends heavily in a finer jute string.  Once the frame was ready I wrapped the whole structure with lots of different 'natural' yarns, jute, sisal and hemp.  This time what began as a circle became more heart shaped but I don't mind the distortions at all, and this one in particular feels more organic because of them.

Finally I decided to make a really solid frame, one that I was pretty sure wouldn't suffer too much distortion from being wrapped.  I went with a really thick copper jewellery wire which I formed into a rectangle and taped the ends together, I meant to go back and find a more permanent solution than sellotape but I just couldn't come up with one, other than getting out the soldering iron!  I wrapped my rectangle frame with some thinner red beading wire, I was unhappy with the way this left jaggy edges sticking out from the frame, but it did give the following layers of wrapping some grip on the otherwise 'slippy' copper frame.  I wrapped another layer of red metallic embroidery thread which did slide about along the copper edges and bunched together leaving gaps so I followed it with another layer of wrapping, this time in a thick red/pink variegated yarn.  I really like this sample, but it has proved incredibly difficult to photograph accurately, my camera seems unable to handle the bright red yarn at all!